Continuing with our examination of longitudinal beams (ji-mune 地棟) in Japanese roof framing (koya-gumi 小屋梁), recall from last week’s post that these beams are called nakabiki-bari (中引梁) when they run above the raised floor zashiki part of the dwelling, and ushi-bari (丑梁) when they run above the earthen-floored doma part of the dwelling. As can be seen in the diagram below, both nakabiki-bari and ushi-bari bear on the large-section daikoku-bashira internal post, at the boundary between zashiki and doma.

At its other end, the ushi-bari may be supported on an large-section ushi-mochi-bashira (丑持 lit. ‘ushi-bearing post’), not shown in the diagram, in the plane of the gable-end external wall. However, because such an oversized post doesn’t ‘fit in’ with the other posts in the gable-end wall, many minka opt for another solution, which is to erect two posts of normal size, with a beam known as a tenbin-bari (天秤梁, lit. ‘balance/scale beam’) between them, and support the ushi-bari on this beam.

A longitudinal beam (ji-mune) supported on a short, deep balance beam (tenbin-bari) tenoned into two posts in the plane of the gable wall.

Photograph showing a) balance beam (tenbin-bari), b) longitudinal beam (ji-mune), and c) ridge pole (muna-gi).
In the Minо̄ and Tо̄hoku regions, there is a beam framing method known as torii-gumi (鳥居組, lit. torii framing), in which posts directly below longitudinal beams are omitted, and all longitudinal beams are supported on tenbin-bari. From the Kansai region west, there are many examples of large minka where ushi-bari are not especially large; instead, a number of beams of uniform size are placed at around 1 ken (1.8 metre) centres and supported on a long tenbin-bari.

Multiple bent ushi-bari bearing on a long beam at right.
As the spans get larger, the beam framing becomes progressively more complex; it is the skilful exploitation of bent or arched beams, and the free, improvised, or ‘emergent’ assembly and interlacing of them into strong structural forms, that is so characteristic of minka beam framing.

On the left, a simple longitudinal beam (ji-mune 地棟) framing system, with a single central ji-mune (either a nakabiki-bari 中引梁 or an ushi-bari 丑梁) supporting a single layer of continuous-span transverse beams (koya-bari 小屋梁). On the right, a more complex system where in addition to the koya-bari there is a lower layer of transverse beams called shiki-bari (敷梁, lit. ‘spreader beam’) or uke-bari (受梁 lit. ‘receiving beam’), tenoned into the posts, that support intermediate longitudinal beams (either ushi-bari or tobihari 飛梁).
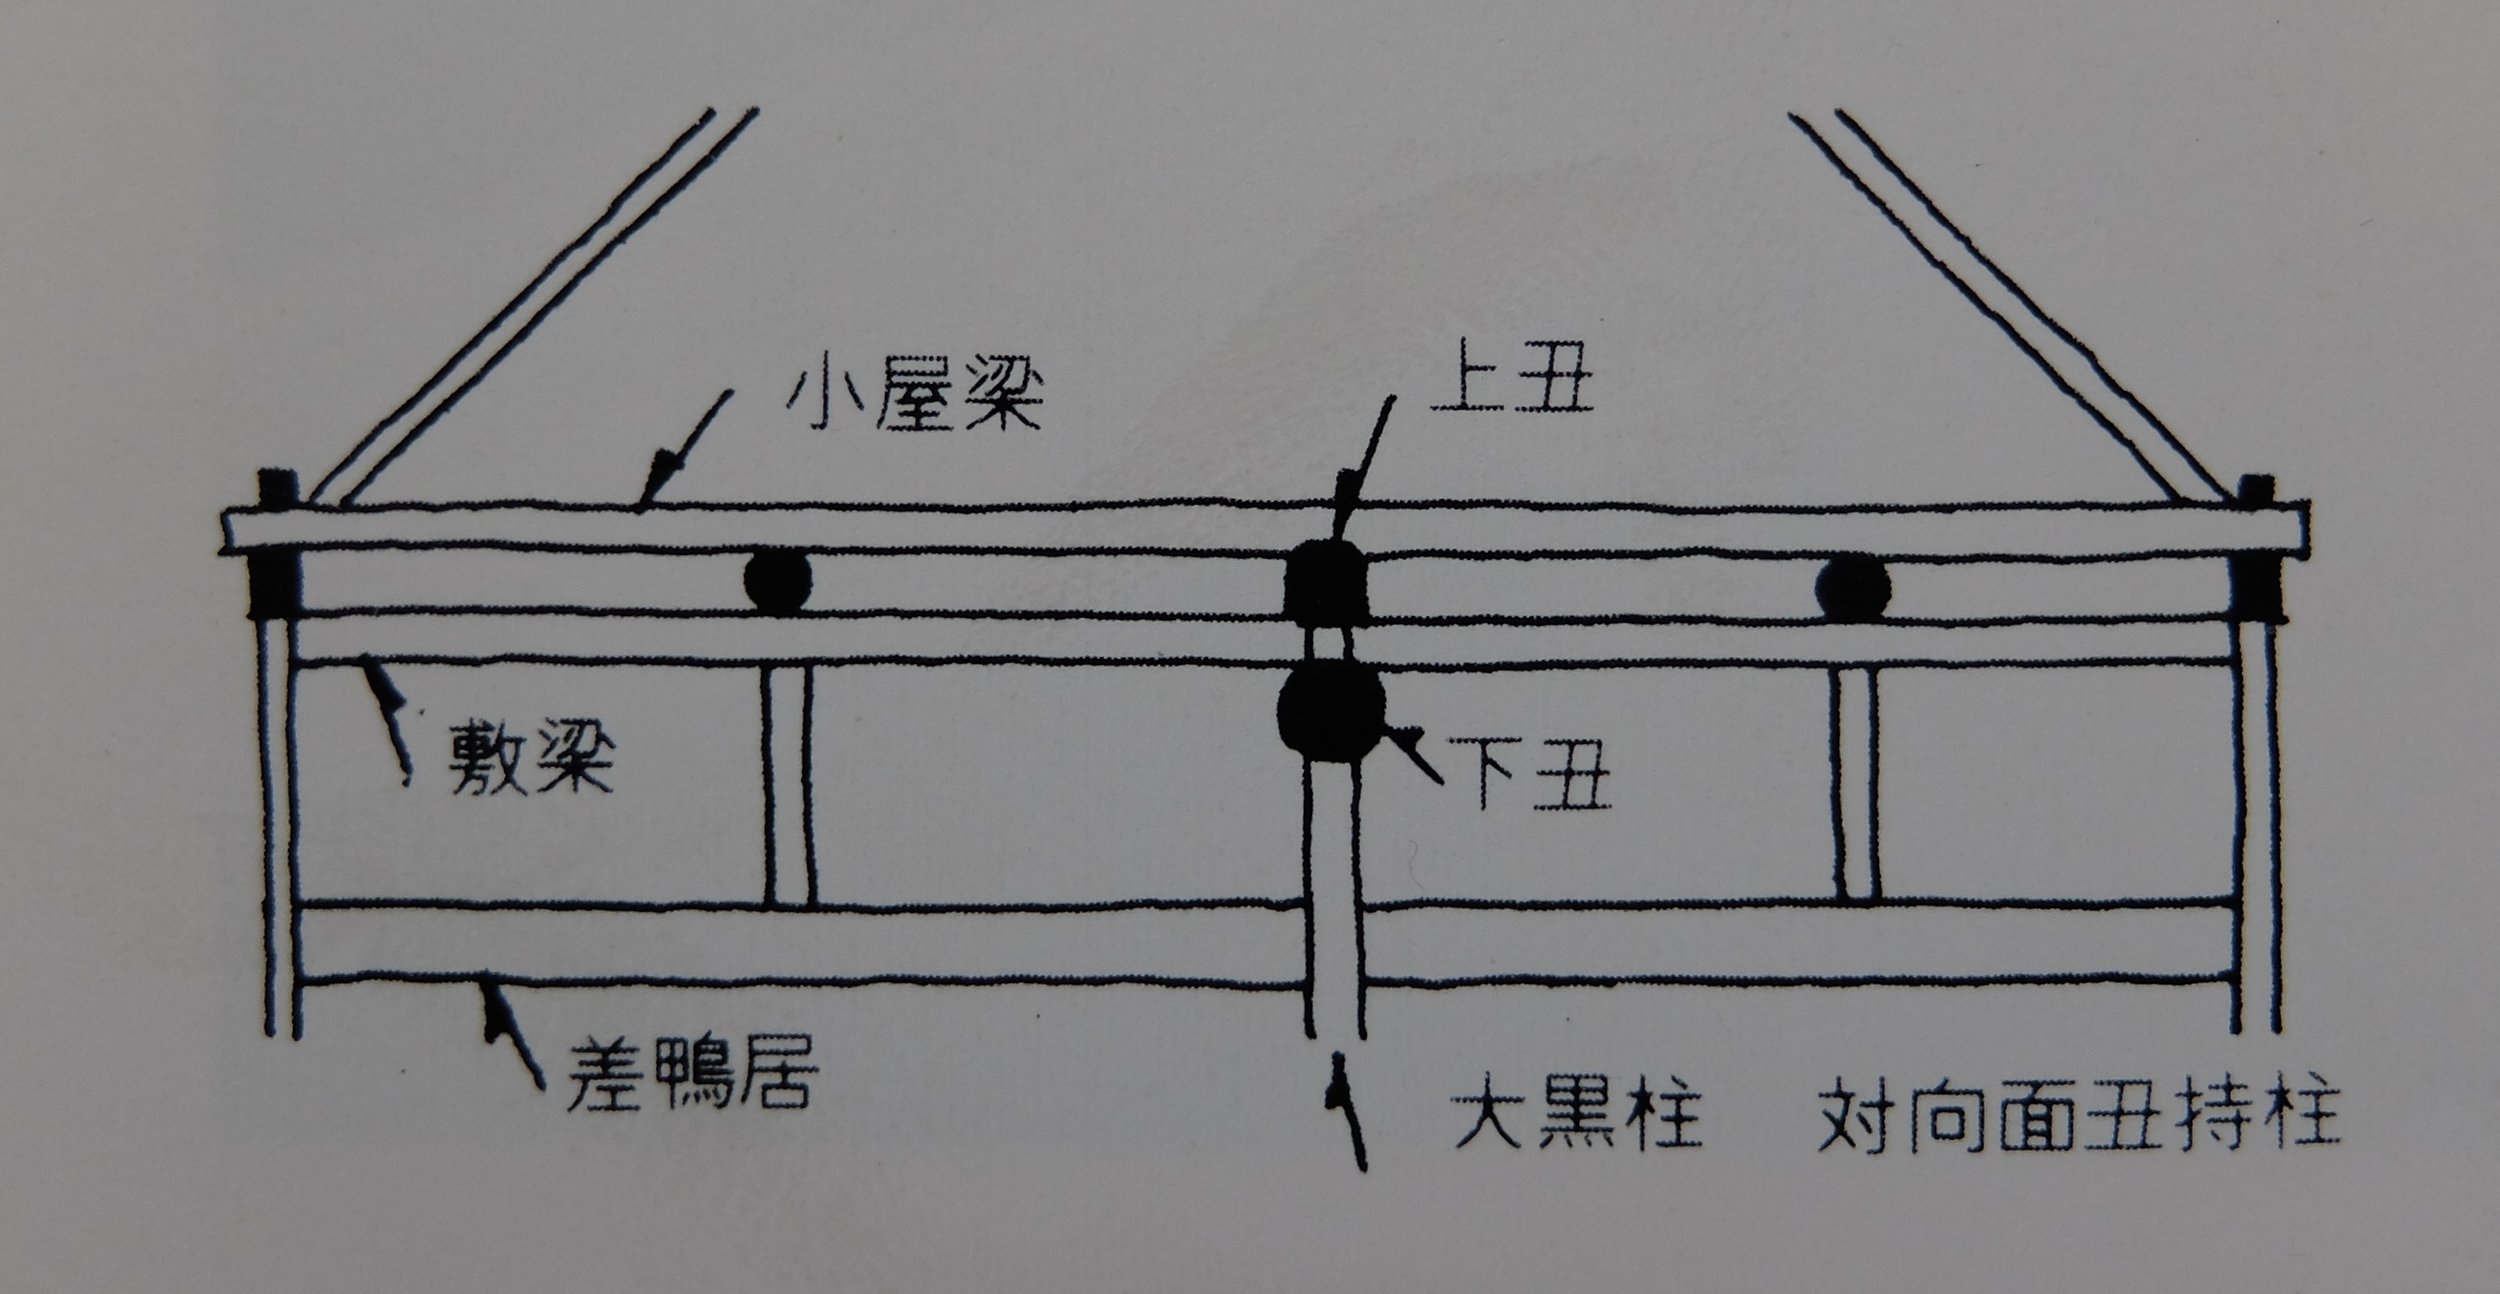
A framing system with two layers of transverse beams, as in the previous example, and two layers of longitudinal beams: the ue-ushi or uwa-ushi (上丑, lit. ‘upper ox (beam)’) and shita-ushi (下丑, lit. ‘lower ox (beam)’). The lowest transverse ‘beams’ are sashi-kamoi (差鴨居), head rails with grooved soffits to receive sliding room partitions.

A framing system with a tenbin-bari (天秤梁) supported on twin posts, and supporting the central longitudinal beam (here labelled as an ushi-bari (丑梁), indicating that it runs over the earth-floored doma part of the minka. Riding on the ushi-bari are inclined beams called nagekake-bari (投掛梁, lit. ‘throw beam’) or agari-ki (上り木, lit. ‘rising timber’). Lower tenoned beams called tsunagi-bari or tsuna-bari (繋梁, lit. ‘tie beam’) tie the inner and perimeter posts together.

Photograph showing a balance beam (tenbin-bari) supported on two posts, and supporting a (ji-mune) and two inclined beams (nagekake-bari or agari-ki). This example differs from the one shown in the section diagram above in that the tenbin-bari sits on the heads of the posts rather than being tenoned into their sides, and the nagekake-bari do not bear on the ji-mune and terminate short of it rather than being joined above it; they are supported only on the tenbin-bari.
In the minka of the mountainous areas of Hirano and surrounding districts in the Kantо̄ region, the custom was to use especially bent and twisted beams, perhaps partly because local conditions made it difficult to get hold of large, good quality pine logs, partly out of the carpenters’ desire to show off their skills, and partly as an alternative to, or a kind of, ornamentation: there were many regions where hanging a ceiling was forbidden under sumptuary laws, meaning that the roof structure was unavoidably exposed, so carpenters were no doubt motivated to elevate the beam framing into an aesthetic element by making it as beautiful and interesting as possible.
In the Kantо̄ region, carpenters undertook a preliminary stage known as chi-gumi or ji-kumi (地組, lit. ‘ground framing’), in which the framing was temporarily laid out and assembled on the ground, and the correct heights of roof posts and other members calculated in advance. This was not customary in the Kansai region, however, where carpenters took pride in being able to successfully erect and assemble the beam framing without a ‘dry run’, having first accurately calculated the heights of bent or arched beams using only roku-zumi (陸墨, lit. ‘land ink’, i.e. horizontal reference lines snapped onto the timbers with an inked string).
In sasu-gumi or ‘principal rafter construction’ where there are no posts (tsuka 束) or penetrating ties (nuki 貫), the completion of the beam framing marked the end of the carpenter’s involvement; from there, the villagers, including both experienced roofers (yane-ya 屋根屋) and general hands, would undertake the framing of the principal rafters (sasu 扠首), underpurlins (moya 母屋 or yanaka 屋中) and common rafters (taruki 垂木 or 棰) themselves. This was not complex joinery work but involved mostly rope tying, in which the roofer was more skilled than the carpenter.